
To run an Expo React Native application, here are the step-by-step guideline for you:
📋 Prerequisites
1. Install Node.js and npm (Node Package Manager) – (Installation guideline)
2. Install yarn – (Installation guideline)
3. Platform specific installation tools
Android:
- JDK (Java SE Development Kit)
- Setup Android Studio – (Installation guideline)
iOS:
- Install Xcode (Installation guideline)
5. Install Text Editor / Visual Studio code (recommended) – (download link)
Android: Or Go to the official React Native website at (https://reactnative.dev/docs/environment-setup?guide=native#jdk) and follow the environment-setup instructions.
Ensure that all the prerequisites mentioned above are installed on your machine, and then proceed with the following steps.
🚀 Configuration, Build, and Run
STEP-1: To get started, please extract your martvill-customer-app.zip file first.
STEP-2: Open VS Code and navigate to your project folder:
- Launch VS Code.
- Select “File” from the top menu, and then click “Open Folder…”
- Browse to the location where your app folder is and select the app folder. Click “Open.”
STEP-3: Install the project dependencies (yarn install):
- Open a new terminal in VS Code by selecting “View” from the top menu, then “Terminal,” and finally “New Terminal.”
- In the terminal, navigate to the project folder root if you’re not already there. You can use the cd command to change directories.
- Run yarn install to install the project dependencies. This command will read the package.json file and download the necessary packages.
STEP-4: (Android) Open Android Studio:
- If you haven’t already, install Android Studio from the official website (https://developer.android.com/studio) and set up an Android emulator.
- Open Android Studio and click on the “AVD Manager” icon in the toolbar.
- Create a new Android Virtual Device (AVD) if you don’t have one already. Choose a suitable device configuration and Android version, then click “Next” and “Finish” to create the AVD.
- Make a note of the AVD name, as you’ll need it in the next step.
For iOS open Xcode and select the device
STEP-5: Update your project’s environment variables in the “.env” file.:
- Locate the “.env” file in your project directory.
- Make the necessary changes to the environment variables, following the specified format (e.g., VARIABLE_NAME=value).
- Save the changes to the “.env” file.
- Ensure that you don’t accidentally change the file extension or rename the file.
- Double-check the modifications to verify that the changes are accurate and properly formatted.
- Once you’re satisfied with the changes, proceed to use the updated environment variables in your project.
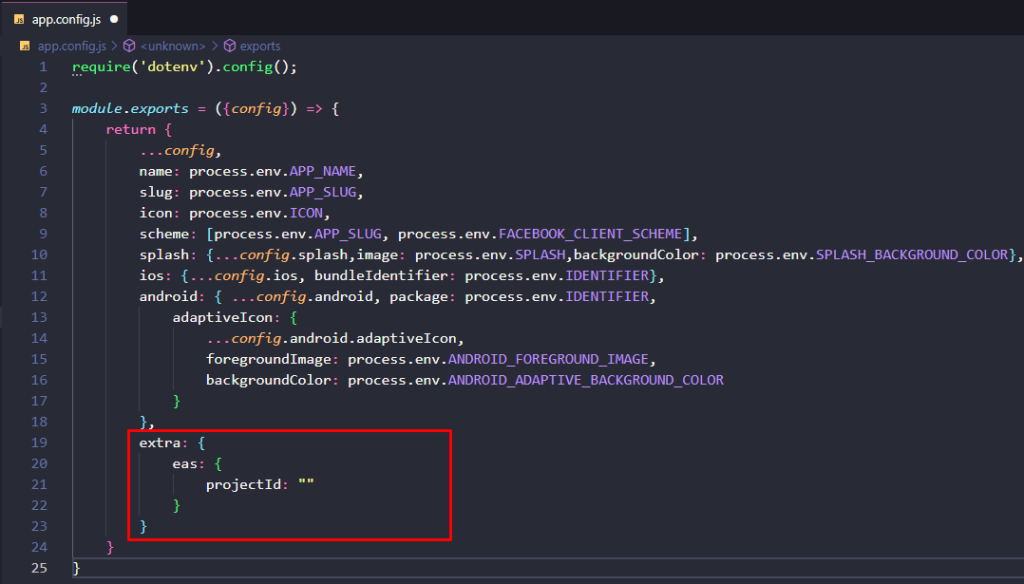
STEP-6: Ensure that the “projectId” field remains empty in your “app.config.js” file.:
STEP-7: Install the latest EAS CLI:
EAS CLI is the command-line app that you will use to interact with EAS (Expo Application Service) services from your terminal. To install it, run the following command:
yarn global add eas-cliSTEP-8: Log in to your Expo account:
If you are already signed in to an Expo account using Expo CLI, you can skip the steps described in this section. If you are not, run the following command to log in:
eas loginSTEP-9: Configure the platforms for EAS Build:
Follow the given instructions to configure an iOS or an Android project for EAS Build:
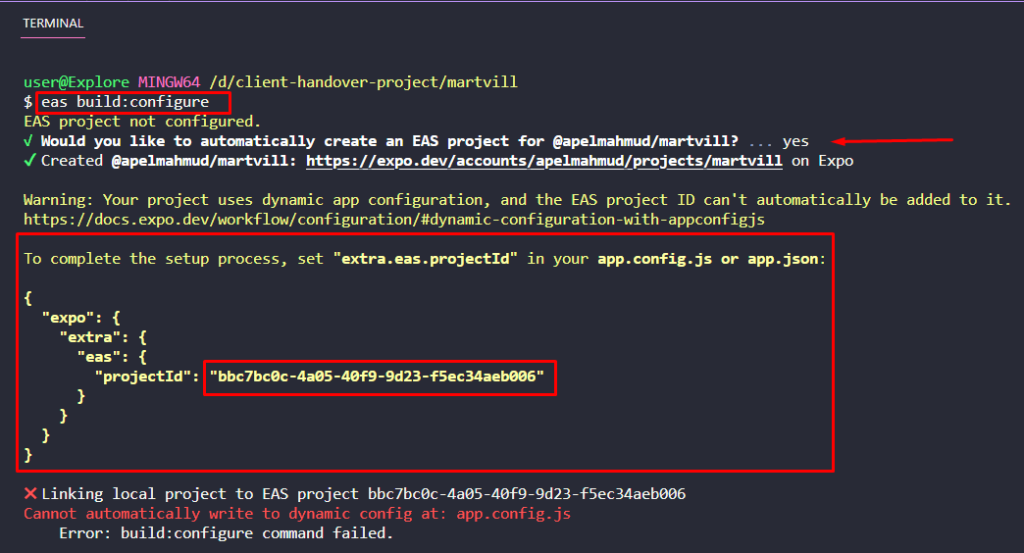
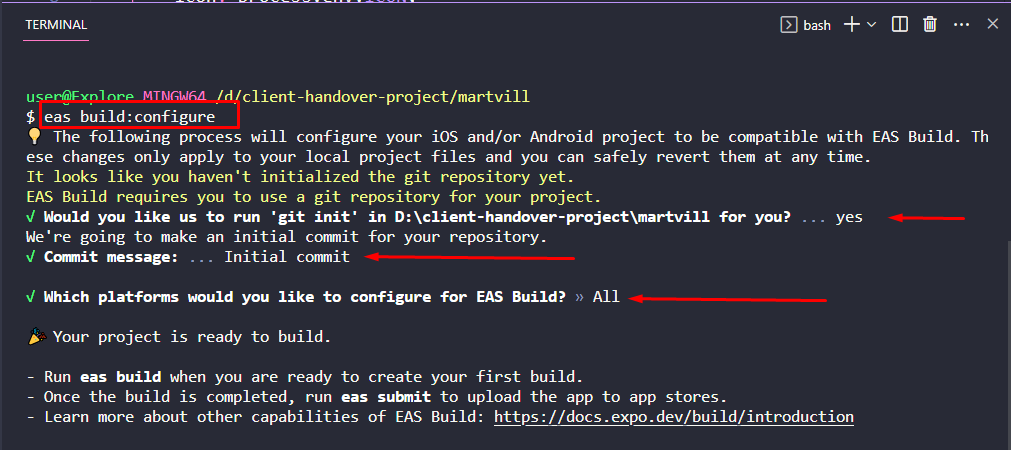
- Run this command “eas build:configure” in your vs code terminal
- When you run the command “eas build:configure”, you will receive a warning message saying ‘EAS project not configured.’ Additionally, a query will be prompted, asking whether you ‘would like to automatically create an EAS project for ‘@your_name/martvill?’ At this point, you should press ‘Y’ for “Yes” to proceed.”
- And once again, you will receive another warning message to complete the setup process, set “extra.eas.projectId” in your app.config.js or app.json:
All the steps of the process will be displayed in the following manner:
- Open the “app.config.js” file and ensure to retain the projectId while saving the changes.
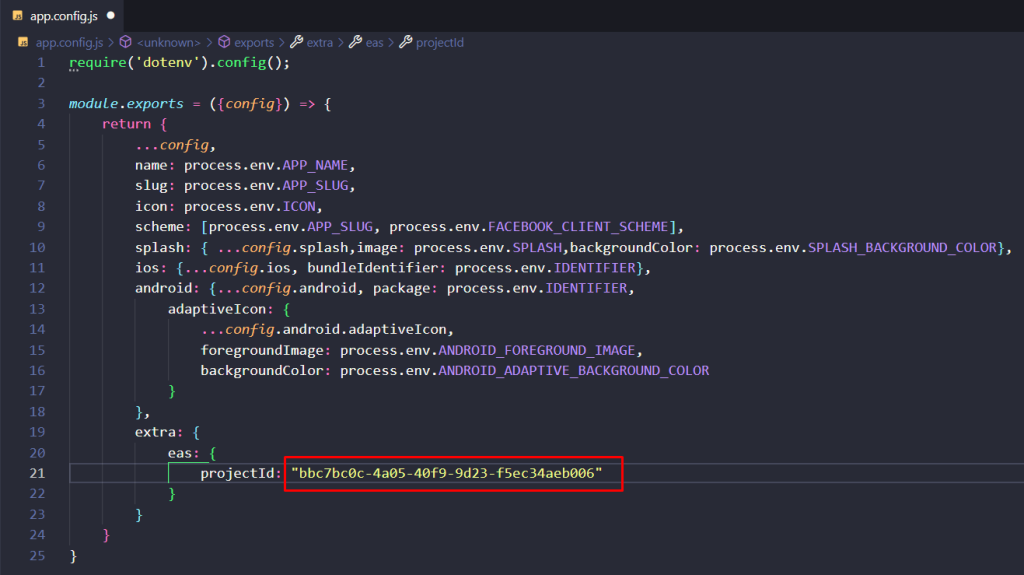
- After setting the projectId, simply run again the command “eas build:configure”, and if you found any steps, simply adhere to the provided instructions.
- EAS Build requires you to use a git repository for your project. At this point, you should press ‘Y (yes)’ for “git init” and simply adhere to the next provided instruction for “Commit message”.
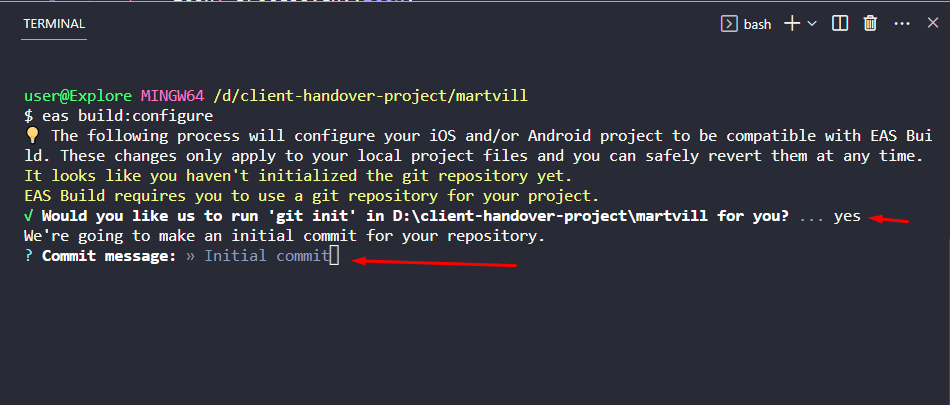
STEP-10 (Optional): Or you can manually Initialize your git repository and make your initial commit to securely store your project.:
- git init
- git add . (optional)
- git commit -m “commit message” (optional)
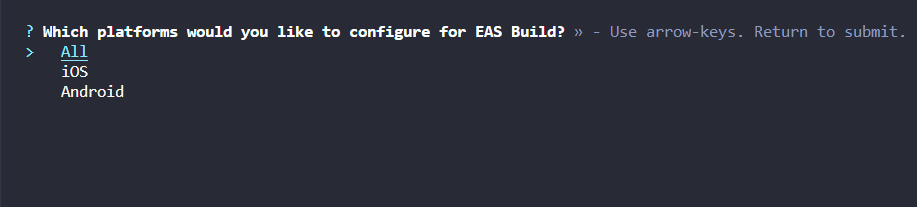
- Also, you will have to meet with a question to select platforms that would you like to configure for EAS Build like below (Select by using the up and down arrow):
- You will receive a message stating “🎉 Your project is ready to build” upon successful completion.
All the above steps of the process will be displayed in the following:
🔗 For more information, you will visit this site – (https://docs.expo.dev/deploy/build-project/).
STEP-11: To build a preview, run the following command:
Build APKs for Android Emulators and devices
eas build -p android --profile previewBuild for iOS Simulators
eas build -p ios --profile previewSTEP-12: Create and install the development build, run the following command:
For Android Emulator and devices
eas build --profile development --platform androidFor iOS Simulator
eas build --profile development-simulator --platform iosFor iOS device
Apple Developer membership is required to create and install a development build on an iOS device.
To register any iOS device, run the following command:
eas device:createAfter registering your iOS device, you can create the development build by running the command:
eas build --profile development --platform iosAfter the build is complete, you can download it on your iOS device by scanning the QR code from the device’s camera from the Expo CLI. The QR code is provided when the eas build command has finished running.
You can also find this QR code on the build page in the Expo dashboard. Click the Install button and scan the QR code using the system’s camera.
🔗 For more information, you will visit this site – Create a build for emulator/simulator
STEP-13: To create a production build, run the following command for a platform:
Android
eas build --platform androidiOS
eas build --platform iosAlternatively, you can use --platform all option to build for Android and iOS at the same time:
eas build --platform all🔗 For more information, you will visit this site – Create a production build
STEP-14: Start the development server:
- In the VS Code terminal, run `yarn start` to start the Expo development server. This command will build your app and provide a QR code for device testing.
- If prompted, choose the option to run the app in the Android emulator/iOS simulator.
- If the emulator/simulator doesn’t launch automatically, you can manually start it by for Android selecting your AVD from the Android Virtual Device Manager and clicking the green “Play” button. and for iOS select the device.
STEP-15:. Test the app on the Android emulator/iOS simulator:
- Once the Expo development server is running and the Android emulator/iOS simulator is launched, the app should be built and installed automatically.
- The emulator/simulator should display your app shortly after the bundling process completes.
- You can interact with the app on the emulator/simulator just like on a physical Android/iOS device.
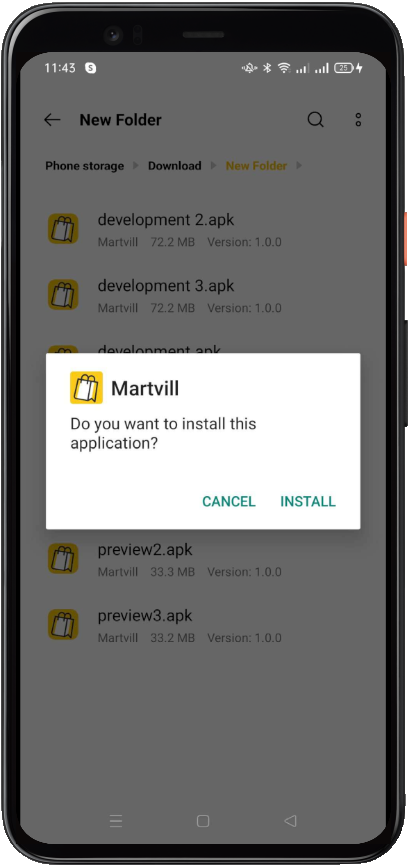
STEP-16 (Additional): How to install your build app on your device.
- Download the APK file, open the Downloads folder or your preferred file manager app.
- Tap on the APK file to begin the installation process.
Follow the on-screen prompts to proceed with the installation.
For iOS You have to follow the ios installation process
- Once the installation is complete, you can find the app icon on your device’s home screen or app drawer.
That’s it! You should now be able to run the Expo React Native app on the Android emulator/iOS Simulator or Physical device using VS Code. Remember, you can also test your app on a physical device by scanning the QR code generated by the Expo development server.
🎉 Submit the app store
Coming soon…
🛠️ Troubleshooting
If you have faced any issues during the app build and running time please feel free to contact our Techvillage team.