
To access the subscription settings interface, navigate to the Admin panel, then go to Subscriptions → Settings.
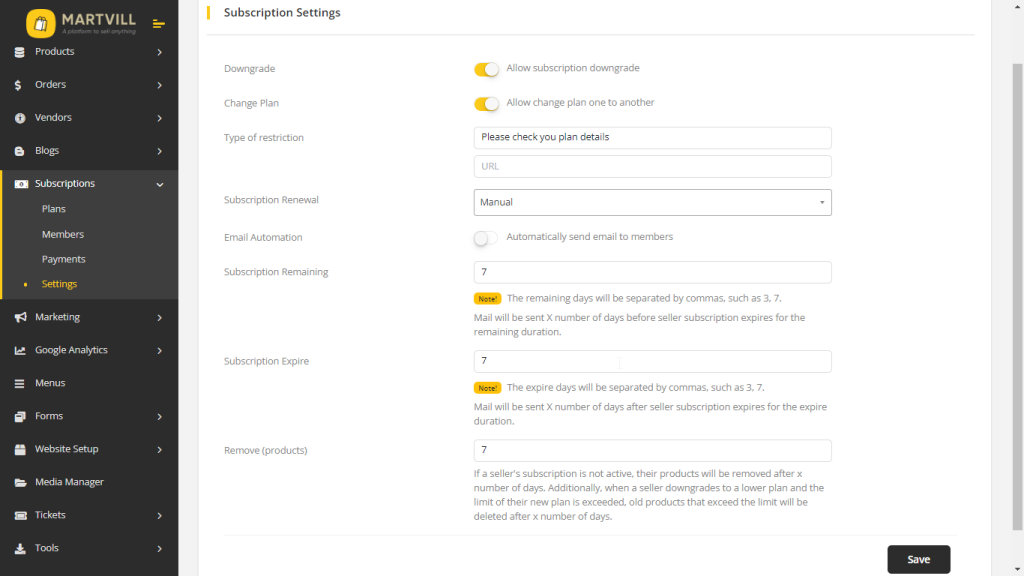
Downgrade: If the ‘downgrade’ option is enabled, customers can switch to a lower-priced subscription plan. This allows them to reduce their costs. However, if the downgrade option is not available, customers cannot switch to a lower plan. In such cases, they can only renew their existing plan or choose to upgrade to a higher-priced one.
Change Plan: When the ‘change plan’ option is enabled, customers have the flexibility to switch their subscription plan as they prefer, which includes downgrading, upgrading, or renewing. However, when the ‘change plan’ option is disabled, customers are limited to renewing their current plan only.
Type of restriction: In the ‘Type of restriction’ section, there are two options. The first one is for a message that you can customize. This message will be displayed to users when they either don’t have a subscription or when their subscription is invalid. The second option is a redirect link. If a user’s subscription is invalid, they will be automatically redirected to the web page you specify using this link if no link is provided, then the user will be redirected to the vendor subscription page.
Subscription Renewal: For Subscription Renewal, you have three options: ‘Automate,’ ‘Manual,’ and ‘Customer Choice.’
- Automate Renewal: If you choose this option, customers will only see automated payment gateways or recurring payment options when they subscribe. Payments will be automatically charged on a recurring basis.
- Manual Renewal: Selecting this option limits customers to manual payment gateways, which are non-recurring. Customers will need to make payments manually each time they renew their subscriptions.
- Customer Choice Renewal: When you opt for this option, customers will have the flexibility to choose between both automated and manual payment gateways during the subscription process. They can select the payment method that suits their preferences.
Email Automation:
If you enable email automation, the system will automatically send emails to users at specific times. Additionally, it can remove a product from a user’s if their subscription has expired within a specified period. You can configure the timing and options for this in the ‘Subscription Remaining,’ ‘Subscription Expire,’ and ‘Remove Product’ settings, which we can discuss later.
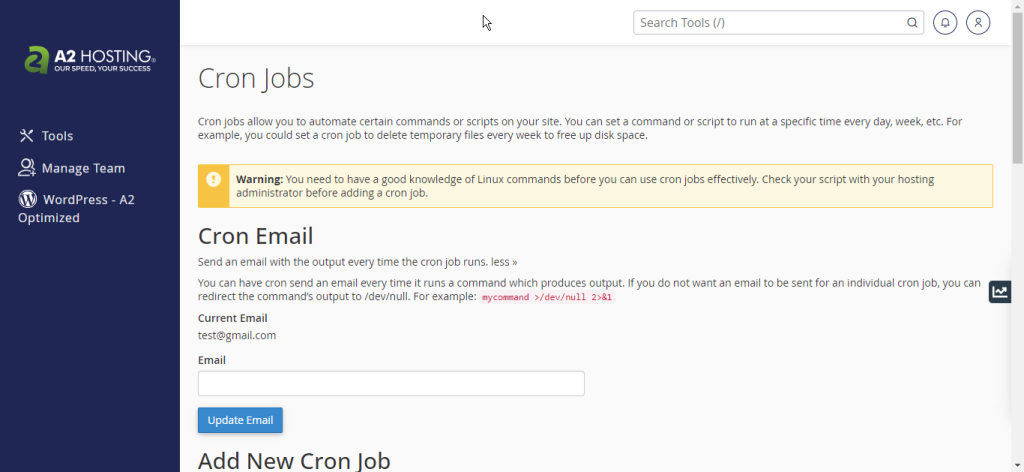
To enable email automation, you’ll also need to set up a ‘cron job’ in your cPanel. To do this, navigate to your cPanel and access the ‘cron job’ section for configuration.
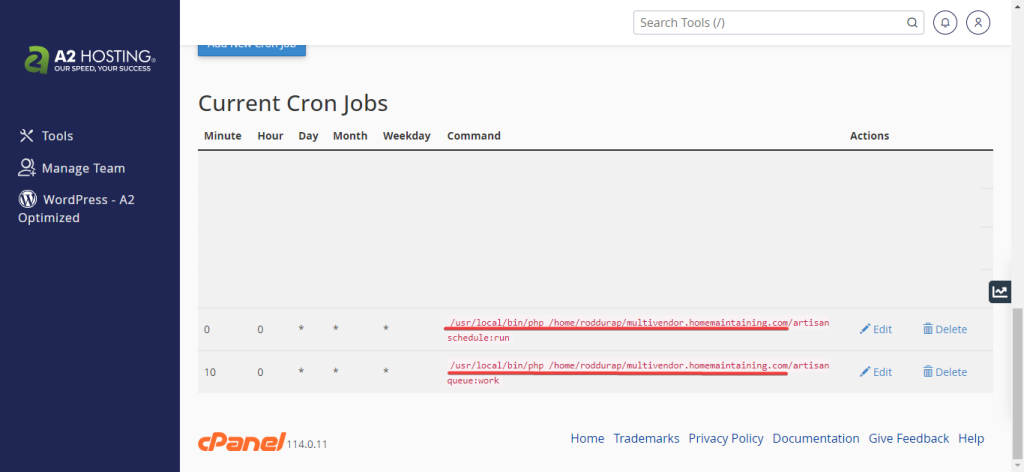
In the provided attachment, you can observe two cron jobs applied. The red-marked portion represents your project path. After the red mark, you will notice ‘artisan schedule:run’ and ‘artisan queue:work.’ This is a crucial part of the setup, and it must be configured with extreme care. Any mistakes in this setup could result in email automation not working as expected.
Subscription Remaining: With this option, you can schedule email reminders for users before their subscription expires. To set this up, simply enter the desired number of days, separated by commas (,). For example, you could input ‘3,7,9’ to send emails 3 days, 7 days, and 9 days before the subscription expiration date. If you don’t specify any days, no remaining message will be automatically sent.
Subscription Expire: This option is similar to ‘Subscription Remaining,’ but it deals with emails sent after a user’s subscription has already expired. You can specify the number of days after expiration when the email will be sent. For example, if you enter ‘3,7,9,’ emails will be sent 3 days, 7 days, and 9 days after the subscription expiration date.
Remove Products: This option allows you to automatically delete a product of users after a specified number of days following their subscription expiration. For example, you can set it as 3 or 7 days. If you don’t specify a value, no product will be automatically deleted when a subscription expires.